Halloween is here. Of course, we always want to ensure the safety of our children in every way possible, and decreasing sugar intake is no exception. While we don’t want to encourage children to accept more wholesome unwrapped treats from strangers (like apples), with a little creativity, we can turn Halloween into a holiday of fun that isn’t solely attached to how much candy they can collect and shove into their mouths.
People often ask what I do with our daughter for Halloween. Do I cave in to the spirit of the day and let her pig-out on sugary treats? Play the role of Scrooge two months early? I will admit that as Chloe got older the strategy changed. This is why it’s so important to start planting healthy ideas as early as possible. When they are young you have more control. As they get older, you want them to take the lead and start making good decisions for themselves. They also have to make a few mistakes AND pay the consequences. This strategy works best if they have a good foundation. However, this doesn’t mean a candy free-for-all.
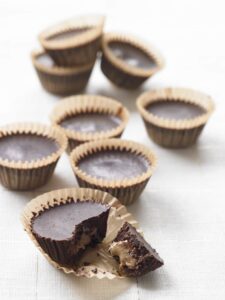
I use a pro-active strategy to emphasize the fun and still keep all those sugary treats at bay. We make pumpkins out of tangerines, decorate bananas to look like witches and make sugar-free “Nutty Butter” cups (recipe below) that taste exactly like her favorite candy. We make healthy desserts – pumpkin bread and pumpkin pancakes.
My daughter is now old enough to assume control over what she eats. I’ve written before that she can choose what she eats (within reason) outside the house, but when she’s at home, I’m the boss. We have a Halloween deal. She goes trick or treating with her friends, and when she gets home, I offer her a small amount of money for every candy bar she’s willing to part with. Since she discovered shopping early (she is girl after all), she is usually happy to give up most of it. Since she’s partial to Reese’s Peanut Butter Cups, she insists on keeping a few of those. But ever since I came up with a sugar free, 2 ingredient recipe for “Nutty Butter Cups” (that taste exactly the same), she only keeps a few. She’d rather have the money.
The other part of this rule is that she doesn’t get to eat all her candy at once. She agrees to eat only two of her saved candy pieces per week. Fortunately, after the second week, she usually forgets about her stash.
We don’t get trick or treaters in my neighborhood (my daughter joins her friends elsewhere for this annual ritual, although this year will be different with COVID-19 restrictions). But I do have suggestions for non-candy treats that can be fun for kids:
- Stickers
- Packs of pencils
- Glow-in-the-dark plastic jewelry
- Fake tattoos
- Mini magnifying glasses or little snow globes
In preparation for Halloween, save your spare change in a big vase or pot and let kids take a handful (or two, if they’re little kids). I’ve read that some parents give out dollar bills.
Enjoy this recipe to help you have a Happy, Healthy Halloween!
Nutty Butter Cups
(No one will believe they aren’t Peanut Butter Cups)

Ingredients
4 ounces sugar free chocolate (Brain in Love bars), broken into chunks
¼ cup cashew, almond or your favorite seed butter (any nut or seed butter)
Optional- 2 Tablespoons coconut oil
Optional- 1-2 Tablespoons erythritol
Preparation
- Line a mini muffing pan with candy paper or mini muffin liners. Muffin liners will probably be too large.
- In a microwave safe bowl, put about 1/3 chocolate and coconut oil if desired. Coconut oil is not necessary. But it will give you a bit of grace, guaranteeing you don’t burn your chocolate, and that you get smooth sauce every time. Heat chocolate in 30 second intervals, stirring each time. Heat until it is completely melted and smooth, being careful not to burn.
- Spoon about a teaspoon of the chocolate mix into each candy paper.
- Put tray in the freezer for about five minutes.
- While chocolate is cooling in the freezer, prepare nut butter and melt remaining chocolate (and coconut oil if desired).
- Stir in erythritol if you prefer a sweeter taste.
- Remove tray from freezer. Drop about ½ teaspoon size balls of nut butter in the middle of each cup, on top of chocolate bottom. Lightly press so that the nut butter doesn’t protrude over the top of the cup.
- Spoon chocolate mixture into each cup, covering the nut butter completely. Be sure you get the sauce around the sides. If necessary, flatten the top and smooth over with chocolate. If chocolate doesn’t surround the sides of the nut butter, it will look layered, as the nut butter will show through.
- Freeze for about 15 minutes before serving.
Click here for more Brain Warrior sweet treats.


